Automated Testing Part 4: Legacy Code
In the series so far, we have looked at automated testing in general, with a focus on unit and integration testing. Underlying this has been an implicit and dangerous assumption that you are writing new, modern, well structured MultiValue code. Adopting a test supported development methodology, despite being a change in attitude and practice, is relatively simple if you have a clean starting point.
Many readers will not have the luxury of being able to write new, modern code. For them the daily lot may be hacking away at the code face of a long established application, complete with archaic coding conventions and years of unstructured organic growth.
So in this article we turn our attention to the most complex issue of automated testing — how to test and refactor your legacy code.
Setting your Expectations
Don't Panic.
The first advice in approaching legacy code is to set realistic expectations in what you can achieve. You probably won't end up with your code fully covered or even fully testable in a single iteration. But any testing and code cleansing is better than none, so unless your code is already perfect, whatever time you spend can still leave you in a better place than you are now.
What is important is to leave each iteration with a clear knowledge of what has and what has not been refactored and test covered, so that the next time you approach the tangled mass you can feel confident about the parts that have been tested and can move on to unravel the next piece.
It is also important to realize that your first attempts to refactor and harness your code will be slow — painfully slow — but don't lose heart because this will get better and quicker with time and practice.
What is Refactoring?
Refactoring is key part of the cycle for modern development — "Red, Green, Refactor" is the mantra of test driven development, and roughly translates as "start with a failing test, write the code to make it pass, then refactor the code to make it good." Refactoring involves a series of small incremental changes made to improve the structure of a body of code without changing its operations. This is an important distinction to make from all other forms of development that aim to improve or extend the operation of the code. Refactoring is a purely internal matter, to leave the code base in a more manageable meant discoverable, and testable format.
With any new development, refactoring should be proven by unit testing. At each incremental change the unit tests are re-run so that the developer can check that the change has not broken anything. Inevitably, with legacy code those tests will not be in place from the start, so the first stage is to simply try to open up the code to get any level of unit testing in place at all, and then work outwards from there, extending the amount of code under test piece by piece.
Refactoring MultiValue Code
Pick up almost any book on working with legacy code and you will find broadly the same recipes being offered to get that code under test: firstly, splitting the code down into ever smaller pieces so that each piece can be refactored and brought under test, and at the same time handling any dependencies between the code and its environment by mocking out anything external that has an influence on the code, such as database connection, web service call, library or API routine, or anything else that is not quickly testable.
Whilst these techniques clearly have merit, they don't always translate well when dealing with MultiValue code. The biggest problem is the code splitting.
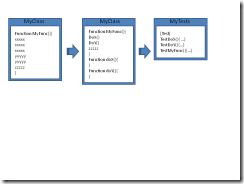
By "legacy code," today's authors generally mean previous generations of applications built using modern, object-oriented and reflective languages such as C# or Java, and it is the very nature of these languages that makes this type of splitting and mocking possible. In these languages, an application or assembly is built from a set of classes, and each class can choose to expose member functions and properties. Taking a large, complex and untidy function, possibly with dependencies on the user interface or some other external feature, and splitting it into small discreet units is relatively simple when the class can expose each of these as public methods so that they can be individually tested (fig. 1).
Fig. 1 Legacy code splitting OO style
MultiValue code does not have a similar way of exposing individual parts of a program for outside scrutiny. The naive answer would be to split out the code into lots of tiny external subroutines and user defined functions (where supported by the database) and to then test each of these in isolation. That works up to a point, but can soon reach the stage where there are code management issues with the number of such routines; and taking something like a data entry screen that may need to hold onto a lot of data whilst it is running and splitting that down into lots of external subroutines can end up with messy common blocks or hugely long inefficient parameter lists. Clearly then, this is not the answer.
How then to "get at" parts of the code in order to test them?
Use Generic Routines
The first step is to look for genuine commonality that can be replaced with the use of generic routines. If your legacy application has entry screens, how much of the validation, lookups, and navigation is hard-coded into the programs? In almost all cases this can be easily ripped out and replaced with a standard screen driver that can handle parameter driven screen input and display, regular validation styles, and lookups. For an example see the free ENTER screen runner on my web site.
The same approach can be taken with most reporting, security, menus, imports, exports, and other paraphernalia. By substituting common routines, you can quickly and immediately reduce the amount of code you need to get under test and also deal with many of the dependencies at a single stroke. It can also increase the resilience of your system by reducing the opportunities for error.
Once you have dealt with the generics what remains is the core of your business logic. This is the code that we need to get under test, and that does mean addressing its constituent parts.
Use Code Blocks
One option is to split your code into blocks and use a pre-compiler to bind these together again in a similar way to a Basic INCLUDE statement. Unlike the use of external subroutines the final code still contains everything you need and so the overheads involved in handling large numbers of external subroutines can be avoided.
Those same code blocks should then be separately wrapped into subroutines purely for the purpose of unit testing. Again you will probably find a lot of commonality as you do so and thus reduce the overall code burden. Each block will then be tested before it is included into its destination programs. I use a standard library of such blocks to cover such mundane things as command line argument handling, socket interfacing, clipboard functionality, and so forth for the different MultiValue platforms. These blocks I can expose either as standard subroutines or bind them directly into utility code. Most of my free utilities are built with these.
Use Action Parameters
The last option is to use an addressing scheme within the code itself. If we return to the object-oriented languages above and the class structure with its exposed member functions, the way to represent this in MultiValue code is not as lots of external subroutines sharing a common block, but as a single external subroutine taking the place of the whole class. A class is like a well structured subroutine with lots of smaller internal subroutine branches:
SUBROUTINE MyClass
GoSub DoX
GoSub DoY
RETURN
How then to address these branches?
The simplest way is black box testing, in which the subroutines are run under predictable conditions and the results alone are examined. That is a good starting point but does not offer much confidence in terms of code coverage.
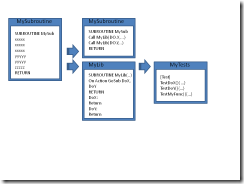
My preferred technique when approaching a legacy subroutine or program is to simply divide it into two parts. The first of these has the same name, arguments or conventions as the original routine so that any calls made to it will be unaffected, and initially this will contain all the code.
The second part is an external subroutine that will become a library of calls needed to support the functionality in the first part and with a simple calling convention:
SUBROUTINE mysub.lib(Action,InData, OutData, ErrText)
With these in place I can begin to move pieces of functionality out of the first part and into its supporting library as separate internal subroutines, and I allow each functional piece to be addressed through a separate action:
Begin Case
Case Action = ACTION.DOX
GoSub DoX
Case Action = ACTION.DOY
GoSub DoY
End Case
Over a short period of time, the code in the original routine is replaced by calls to the library subroutine until it becomes merely the orchestrator of events. And naturally, as each piece of code is moved into the library routine a new unit test is developed for that code until all the working parts are harnessed.
There will be overheads, but not of the same magnitude as the overheads from splitting into large numbers of separate routines. The caching schemes operated by some MultiValue databases will mitigate most of the effects of this. On UniVerse systems, for example, the first call to a subroutine loads it into memory where it persists until the session returns to TCL, so repeated calls to the same routine have very small overheads. UniData's shared code manager is designed for similar purposes (fig. 2).
Fig. 2 Legacy Code Splitting Multivalue Style
Techniques such as these, combined with adopting good programming conventions and modern development methods, make it possible to get your legacy code under control and to refactor your code to be both testable and intelligible.
In the next article we will turn our attention to two more techniques you can harness to start dealing with the dependencies in your code: UI testing and subroutine mocking.


