Installing and Using UniVerse ODBC: A Quickstart
UniVerse has had the ability to provide access to its data via ODBC for years. Yet I still find a lot of shops who either are not aware of this, or who have tried to use it but failed. I think one of the problems is the lack of an end-to-end example. This quickstart will try to provide that.
There are two areas to be considered when installing and using UV/ODBC — the server and the client.
The server side is very straightforward, as there is nothing to install. As of UniVerse release 10.1, the ODBC software is part of the normal installation. What you do need to make sure of is that the RPC daemon or service is running. On *nix-based systems you logto the UV account and select the option from the menus. On Windows-based systems, you will find Unirpc in the system services.
Each account on the server that contains files you want to access needs to be added to the list of ODBC-enabled accounts. This procedure is discussed later in this document.
Each client PC that is going to access the data must have Rocket supplied software installed on it and ODBC Data Source Names (DSN) defined.
We will start by installing the client software on the PC and creating the definitions necessary to access an account on the server. This will then let us observe the effects of the procedures we use on the server side to enable access to the files.
Installing the UV/ODBC client
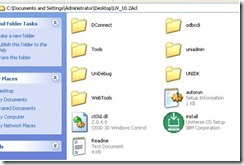
The UV/ODBC client is found on the client CD or can be downloaded from the Rocket Software web site. Figure 1 shows the contents of this folder. Run the installation by double-click on the "install" icon. Then select "UniVerse ODBC client" from the startup screen.
Fig. 1 Contents of the Clients CD
Click "Next" on the Welcome screen and select the path where you want the software installed (fig. 2). (I always leave it at the default location.)
Fig. 2 Install Path
You can then select what components you want installed. I usually take everything.
You are then asked if you want to overwrite the uci.config file. This file contains the definitions of what systems this PC is allowed to access with ODBC. On the first install, it doesn't matter what you answer. If you are reinstalling due to suspecting a missing or corrupted driver, you probably don't want to overwrite this, although doing so simply means you have to redefine the systems with the UCI Editor.
And finally, you get to select what program folder to use. I always use the default which, at this time, is "IBM U2\UniVerse ODBC driver". (Expect to see the IBM branding changed to Rocket Software in the near future.)
After the setup is complete, you will be prompted to restart Windows. And yes, you want to restart before proceeding. (Does anyone ever say "no" to Windows restart prompt?)
Defining the ODBC servers
The next thing to do is define what UniVerse servers this PC can access with ODBC. You use the UCI Editor to make these entries in the uci.config file. You will find this utility in the program folder you specified in the previous steps (fig. 3).
Fig. 3 Invoking the UCI Editor
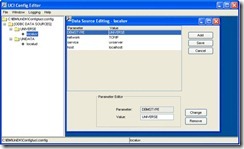
Figure 4 shows a typical server entry. Notice that this screen calls these "ODBC Data Sources." I find that confusing with ODBC DSNs and prefer to think of this as "ODBC Data Servers." You will usually have just one of these entries for each system that has one or more ODBC-enabled accounts on it, regardless of the number of accounts.
Fig. 4 Data Source (Server) Editing
The parameters DBMSTYPE, network, and service will always (in my experience) be UNIVERSE, TCP/IP, and uvserver, respectively.
Set the fourth parameter, host, to the hostname or IP address of the server you want to connect to. In this example, I have used "localhost" because I am running the UniVerse server on the same machine that I am using to demonstrate ODBC access.
Defining ODBC Data Source Names (DSN)
You need a DSN on the PC for each UniVerse account on the server having files you want to access with ODBC. This is done by using the ODBC Admins tool that you will find in the same program folder as you did the UCI Editor.
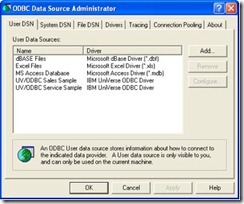
The initial screen (fig. 5) shows you what DSNs are already defined on this PC. User DSNs are visible only to you. If you want anyone logging in on this PC to be able to use ODBC on that UniVerse account, put your definition in the System DSN tab.
Fig. 5 ODBC Data Source Administrator
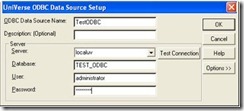
Click "Add." Figure 6 shows the dialog you use to define the Data Source.
Fig. 6 Defining an ODBC DSN
- Data Source Name is whatever you want to call it. I usually name it the same as the name of the account on the UniVerse server.
- Server is the name of the ODBC server you defined in the UCI Editor.
- Database (term taken from SQL) is the UniVerse account name where the files (tables) are located.
- User and Password are what the ODBC driver will use to connect to the server. These are defined in the server logins and will determine the permissions for this connection.
After completing these fields, hold your breath and click "Test Connection." You should be rewarded with a "Connection passed" alert box. You can dismiss the message by clicking the "OK" button, or just stare at it for a couple of minutes and bask in the glory. You've cleared the first hurdle.
Connection failures I have seen have usually been due to:
- The RPC daemon (Unix) or service (Windows) is not running on the server.
- The User and Password not being a valid login on the server.
- Typos in the User and Password fields in the dialog in figure 6.
- The RPC port being blocked by the network.
If you want the password for the connection to be saved so the PC user does not have to supply it, click on "Options" to expand the dialog check the box labeled "Save Password" (lower right portion of the options).
The other options are documented in the ODBC Guide (10.2) starting on page 3-11 and are typically experimented with on a site-by-site basis for performance tuning.
Accessing UniVerse files using ODBC
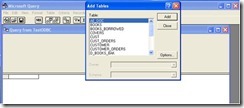
At this point it may seem like you are ready to access the data in UniVerse files on the server. Let's try it using a tool like MSQuery (or Excel, which calls MSQuery). Launch your utility and select the DSN you just defined. If the connection is successful (it should be if Test Connection in the previous step worked), you will be shown a dialog from which to select tables (files) from the account to add to the query wizard.
How odd. The Add Tables list is completely empty…
The problem here is that the UniVerse account we referred to in the DSN has never been enabled for ODBC access. So we need to go back to the server to do this. In normal practice, you would probably do everything you need to do on the server before setting up the PC clients. I wanted to demonstrate what happens if you don't.
Log onto the server as root or another administrator id and LOGTO HS.ADMIN. At TCL, use the command HS.ADMIN to invoke the ODBC menu (fig. 7).
Fig. 7 HS.ADMIN Menu
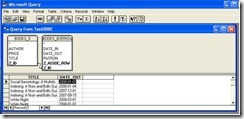
To make all UniVerse files in an account available to ODBC, use option 3. After that, all the files in the account will be accessible as tables (fig. 8). Associated multivalues, such as BORROWED in the BOOKS file are broken out into linked tables through a process Rocket calls "dynamic normalization."
Fig. 8 Files and Associated Multivalues as Tables
You can now complete your test query as shown in figure 9.
Fig. 9 Completed Query
Two other options from the HS.ADMIN menu deserve mention.
Option 5, HS.SCRUB, checks both the dictionary and data sections of a file to make sure that the data really is what the dictionary says it is. For example, it will squawk if it finds non-numeric data in a field defined as MD2. It has a FIX option on it, but against production data, I prefer to handle things myself, correcting either the data or the dictionary on a case-by-case basis depending on what effect it will have on the application.
Option 6, HS.UPDATE.FILEINFO, should be run anytime you change the account by adding or deleting files, changing association definitions, etc. It's the first thing I try when I'm not seeing what I expect on the ODBC side.
Hopefully the end-to-end example in this quickstart will enable you to get started with UniVerse ODBC and provide a basis for further exploration of the UV/ODBC manual.

