OpenXML Part 3: The OpenXML 2.0 SDK
In the previous article we looked at the SpreadsheetML portion of OpenXML and techniques for parsing Excel document content from within the database. In this article we focus on the OpenXML SDK 2.0 as an alternate means for building Excel and Word documents.
The OpenXML 2.0 SDK is a freely available .NET library from Microsoft that allows Windows developers to navigate and to build OpenXML documents using strongly typed classes and partially insulated from the underlying XML. This is a veneer over the OpenXML schema, since in practice, you still need to understand the document structure to have any chance of building a viable document. Knowledge of VB.NET or C# and of LINQ are also required.
In this article we will use the OpenXML SDK 2.0 to build a framework application that will generate an Excel spreadsheet from a query executed under UniVerse. This will be a client application using UO.NET to connect and run the query, but it could be adapted to other uses. A service application that could be driven over a socket connection from a Basic program would be another option. This will require at least framework 3.5. Remember that you can use the free Express editions from Microsoft if you do not have access to the full Visual Studio.
After downloading the SDK from Microsoft, you will need to add two new references to your project: DocumentFormat.OpenXML.dll located in the download directory and WindowsBase.dll, part of the regular .NET framework. The DocumentFormat.OpenXML is divided into multiple namespaces so to preserve your sanity. You will need to add using (VB.NET Imports) clauses as follows:
using DocumentFormat.OpenXml;
using DocumentFormat.OpenXml.Packaging;
using DocumentFormat.OpenXml.Spreadsheet;
Generating the Result Data
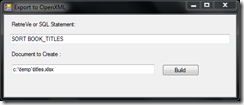
The first step will be to generate the data for export. Because the focus will be on the OpenXML and not the query generation, we will choose the simple route of a UniXML query. This runs a regular RetrieVe/UniQuery or SQL statement and returns the data as an XML recordset that can be automatically formed into a dataset. So our form will look something like the one seen in figure 1.
Fig. 1
Assuming you know how to connect using UO.NET, generating the data is simply a case of running the UniXML statement:
private DataTable dt;
private Boolean getData() {
if (!connect()) {
return false;
}
try {
UniXML xml = sess.CreateUniXML();
xml.GenerateXML(txtCmd.Text);
dt = xml.GetDataSet().Tables[0];
} catch (Exception ex) {
MessageBox.Show(ex.Message);
return false;
}
return true;
}
Obviously, if using a different database, your method of building the data will vary.
Creating the Document
By now you will be familiar with the OpenXML structure — a zipped archive containing multiple document parts that are connected through a hierarchy of relationships. For the spreadsheet, we need to build the spreadsheet, workbook part, and the worksheet that will hold the data. Fortunately, the OpenXML API hides some of that complexity:
doc = SpreadsheetDocument.Create(target, SpreadsheetDocumentType.Workbook);
book = doc.AddWorkbookPart();
book.Workbook = new Workbook();
sheet = book.AddNewPart<WorksheetPart>();
sheet.Worksheet = new Worksheet();
data = new SheetData();
sheet.Worksheet.AppendChild(data);
This creates the necessary structures in memory. But before these can be saved to create an OpenXML document, you will need to generate the references to link these together (fig. 2).
Row r = null;
 int rowIx = 0;
 r = new Row();
 rowIx++;
 for (int i = 0; i < dt.Columns.Count; i++) {
     r.AppendChild(createCell(i + 1, rowIx,dt.Columns[i].ColumnName));
 }
 data.AppendChild(r);

 String cellText = String.Empty;
 foreach(DataRow row in dt.Rows){
    rowIx++;
    r = new Row();
    for (int i = 0; i < dt.Columns.Count; i++) {
       cellText = row.ItemArray[i].ToString();
       r.AppendChild(createCell(i + 1, rowIx, cellText));
    }
    data.AppendChild(r);
}
protected Cell createCell(int col, int row, String text) {
   const String colNames = "ABCDEFGHIJKLMNOPQRSTUVWXYZ";
   int major = (Int32)(col / 26);
   int minor = (Int32)(col % 26);
   String colName = (major > 0) ?
     (colNames.Substring(major - 1, 1) + colNames.Substring(minor, 1)) :
     colNames.Substring(minor, 1);

   Cell c = new Cell();
   c.DataType = CellValues.InlineString;
   c.CellReference = colName + row.ToString();
   InlineString s = new InlineString();
   Text t = new Text();
   t.Text = text;
   s.AppendChild(t);
   c.AppendChild(s);
   return c;
}
Fig. 2
This is typically verbose, so it comes as a relief to know that iterating through the query results to build the basic structure of the export (fig. 3). Each row of data is added to the sheetData, and each cell is created and added to the row. Remember from the previous article that each cell must include its reference address in the A1 format.
// (export data here)

doc.WorkbookPart.WorksheetParts.First().Worksheet.Save();
// create the worksheet to workbook relation
doc.WorkbookPart.Workbook.AppendChild(new Sheets());
doc.WorkbookPart.Workbook.GetFirstChild<Sheets>().?
     AppendChild(new Sheet()
{
     Id = doc.WorkbookPart.GetIdOfPart(doc.WorkbookPart. ?
     WorksheetParts.First()), SheetId = 1, Name = sheetName
});
doc.WorkbookPart.Workbook.Save();
// now safe to close
doc.Close();
Fig. 3
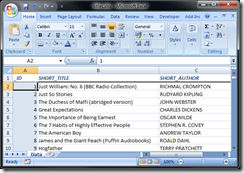
That is enough to create a working export (fig. 4), but with some restrictions — all the cell content is defined as strings, and there is no formatting. For this we need to get a little more sophisticated.
Fig. 4
Applying Styles
As mentioned before, the spreadsheetML (unlike the word processing schema) significantly eases the burden of accessing the data content by separating the data from the presentation. So adding new styles to the spreadsheet takes place outside of the content area we have examined thus far.
The easiest way to create these is, once again, as a template that you then alter using either the OpenXML SDK or direct XML parsing in Basic. What if, for example, you wanted to highlight the column headers or change the background to a column?
The easy way is to reference one of the built-in table styles. This requires adding a new Table part to your document, wherein you will specify the range of cells encompassed by the table and the selection of a standard style. But that limits you, so we will look instead at how you can style individual cells.
Cell styling is held outside of the worksheets in a separate document part to permit the maximum reuse within and between worksheets. The styles document part is composed of a styleSheet element containing fonts, fills, and borders. Let us take the column shading as an example. This is held in a fill element, which defines the pattern and colours used:
<fill>
<patternFill patternType = "solid">
<fgColor theme = "4" tint = "0.79998168889431442"/>
<bgColor indexed = "64"/>
</patternFill>
</fill>
Unfortunately, the fill is not referenced directly. Instead it must be combined with font, border, and other information into a cell style held in an xf element:
<xf numFmtId = "0"
fontId = "0"
fillId = "33"
borderId = "0"
xfId = "0"
applyNumberFormat = "1"
applyFill = "1" />
Only when combined in this way can the fill be referenced using a style (s) attribute as part of the cell definition:
<c r = "A3" s = "4">
<v>2</v>
</c>
All this promotes reuse, but it leads to very lengthy coding. You need to add a WorkbookStylesPart to your workbook part, create a new stylesheet, and populate it with fonts, fills, and borders before you can apply a style. And that is nothing short of painful — a full listing would probably take the rest of this magazine!
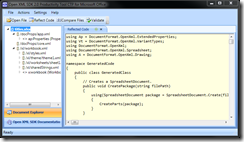
Fortunately, help is at hand. The SDK ships with a Productivity Tool that can capture an OpenXML document and render the complete C# code needed to build it (figure 5). This can then be plundered to generate your template code. If you use VB.NET, you're out of luck.
Fig. 5


