Data Encryption at Rest
Files containing wireless contracts, customer names, customer addresses, and credit card details were found in a recycling bin. Personal data — 3.3 million names, addresses, dates of birth and Social Security numbers — have been exposed due to stolen portable media devices.
Do I have your attention now?
Data security issues should be of concern to anyone managing data, particularly when it contains PII (Personally Identifiable Information) or credit card information. This article will show you how Reality solves these concerns and minimizes the risk of data falling into the wrong hands using its Data Encryption at Rest functionality.
What is Data Encryption at Rest?
This term is used for any data that is physically encrypted and stored on some sort of medium — such as a hard drive, thumb drive or even a magnetic tape — and is decrypted on-the-fly when an authorized user unlocks the data using a defined key to access it.
Reality's Data Encryption at Rest is integrated into its user-based security system, making it very easy to administer. We provide tools for managing the keys that unlock your encrypted data. So let's start by reviewing that security model.
User-Based Security Model
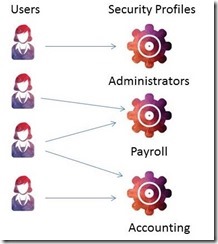
The user-based security model requires each user to have a unique user ID. This ID is linked to a security profile that is typically linked to function or department — such as accounting or payroll — however, a profile could exist for each unique user. Therefore, there may be multiple users with IDs for the same security profile, and a user might be connected to multiple security profiles [ Figure 1 ], similar to MS Windows users and groups' functionality. It's within the security profile that the encryption keys are stored.
Fig. 1 Reality's Security Model
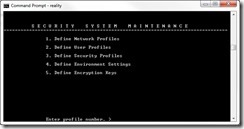
The security system is all controlled via the TCL command SSM which is accessible from the system administrators account — SYSMAN [ Figure 2 ].
Fig. 2 SSM — Accessible from the SYSMAN Account
Create an Encryption Key
Now that we have a basic understanding of the security model, we can begin to discuss the steps to create an encryption key, and then how we may use that key to encrypt a file.
The first thing we must do is to set the admin key, which is used for protecting any keys that you define. You do this via the TCL command SET-ADMIN-KEY key where key is a sixteen-character encryption key. You will need this key in emergency situations, so it's your responsibility to ensure that the key is stored securely but still accessible to relevant members of staff.
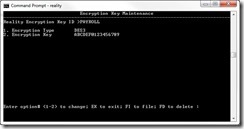
Having identified the files that need to be encrypted, we first have to define the encryption key(s). We do this by using option five of SSM [ Figure 2 ]. Firstly, we must supply a key ID - this is not the actual key but a reference to it. It is this reference to the key that's used to encrypt or save the file. In Figure 3 you can see I have created a key called PAYROLL, its type is DES3 (Triple DES) and I have supplied the sixteen-character key with which our data will be encrypted against. Once we file this, for additional security, the key itself is encrypted. Reality supplies an additional tool called SAVE-REK that can be used to make a backup of your encryption keys so that you can get them back in an emergency, or use them when transferring encrypted data to another server. Similarly, there is a LOAD-REK command to restore your encryptions' keys.
Fig. 3 Defining a New Encryption Key.
Using an Encryption Key
In order for users to use this key, it must be assigned to their security priority via option three [ Figure 2 ] — Define Security Profiles. Within this, field twenty-five — Reality Encryption Keys — must be modified to add our newly created key to it, and we use the key ID and add it to the profile. Remember, there may already be encryption keys in use, as a profile can have multiple keys.
Once you have created your encryption key items, you can create encrypted files to hold your data. This is done by using CREATE-FILE with the (C option. You will be prompted for the ID of an encryption key. See the example below.
:CREATE-FILE MYENCFILE (C
Enter Reality encryption key: PAYROLL
[417] File 'MYENCFILE' created.
D code =DL, modulo = 1, separ = 1
[417] File 'MYENCFILE' created.
D code =DL, modulo = 1, separ = 1
Note that by not specifying the modulo and separation from the CREATE-FILE we create an auto-sizing file, the modulo and separation is not really 1 and 1.
If you want to encrypt the contents of an existing file, you must create a new encrypted file and copy the contents of the existing file into it (remember to copy the dictionary of the file separately). You can then delete the existing file and rename the new one to have the same name as the deleted file. The code below shows an exampe to encrypt the data in the file CUSTOMERS :
Enter Reality encryption key: PAYROLL
[417] File 'TEMP' created.
D code =DL, modulo = 1, separ = 1
[417] File 'TEMP' created.
D code =DL, modulo = 1, separ = 1
:COPY CUSTOMERS *
TO:(TEMP
13 items copied.
:COPY DICT CUSTOMERS *
TO:(DICT TEMP
8 items copied.
:DELETE-FILE CUSTOMERS
:RENAME-FILE TEMP
TO:CUSTOMERS
The file that formerly resided in the ACCOUNTS account and was called TEMP still resides in the ACCOUNTS account but is now called CUSTOMERS .
A cautionary note: As with other databases, a simple delete of data does not physically remove the data from the medium. All it does is set a flag to say the data no longer exists. As a result, the steps above will still leave a footprint of the unencrypted data (the old version of the file) on the disk, or other medium, until that space is re-used. So, if you lose the medium, the potential is there to still access unencrypted deleted data.
One solution you can use is to copy the data as above to your newly created encrypted file and, before deleting the original unencrypted file, physically re-write all the data in the file with a random set of data. You must ensure that the item sizes remain the same. Do not be tempted to write binary data over the existing records, as this will force the item to become 'out of group' again, potentially leaving the original footprint of the item in place. Once that overwrite has been completed you can then delete the file. There are various techniques and methods available to make reading overwritten media harder to get back, and you should be able to find more details on these with a Google search.
Encrypting Individual Fields
If you wish to encrypt certain pieces of information in each item, and control this directly from your application, then you may use the DataBasic function ENCRYPT . To decrypt you would use the function DECRYPT .
For example:
MYKEY = "2":@AM:"0123456789012345"
TEST = ENCRYPT(myfield, MYKEY,5)
This would encrypt the data held in the variable myfield using Triple DES (represented by the 2) against the key 0123456789012345 and return the data into the variable TEST .
Creating an Encrypted Backup
Backups are still an important tool in our constant need for data security and protection against loss. If you have a well-rehearsed Disaster Recovery Plan, then you're almost certainly taking backups and moving these off-site somewhere. However, how can you ensure that in the worst case scenario — the backup goes missing, either by accident or through a deliberate act — that the data contained within it is secure?
If you have created an encrypted file, as discussed above, then that data will remain encrypted on the save, as Reality does not decrypt the data to save it. The one exception to this is a T-DUMP whereby the data is first unencrypted before being dumped to the media.
If you want to create a fully encrypted backup of all the data, including the T-DUMP format, then you must first define an encrypted physical or pseudo-tape drive. You can either do this in the database config file so it's defined permanently, or you can define it as a one-off using the T-DEVICE verb. The device configuration is the same whether it's in the database config file or via T-DEVICE .
The syntax is:
T-DEVICE { unit { device path {device type}}}
If the device type is unspecified, but unit and device path are both specified, then it defaults to a tape image (pseudo-tape).
To add encryption also to the tape definition, we also need to append :kencyrptionkey where the encryptionkey is as we defined above. So an example, using our payroll encryption key to a Reality tape image, would be:
T-DEVICE 1 c:/temp/mytape.rti:kpayroll
This specifies tape unit 1 using the file c:/temp/mytape.rti and the encryption key referenced by payroll . Now we can assign ourselves to this tape unit and begin our backup procedure. All the data, regardless of whether or not it's encrypted at rest, will be encrypted on the backup using the supplied encryption key.
Note: If you wish to restore the encrypted data, then you must first restore the encryption key using LOAD-REK as described above, if it's not already present for the database that you are loading into.
This is just a brief discussion of Reality's security model and how encryption fits into this. We have discussed how to create an encryption key, how to use this to create an encrypted file, how to encrypt individual fields of data and finally, how to secure your off-site backups by creating a fully encrypted save. Want to know more? Contact your local representative or go to www.northgate-is.com/reality or check out the online manuals and use the index to find more on encryption.


