OpenInsight and QM - Such a Deal
OpenInsight, from Revelation Software, has been a true GUI MultiValue database and development tool since 1992, and has had tools for the Web and Browsers since 1996. We've worked on making our tools available to many of the MultiValue databases in the past. There is now a connector to Ladybridge System's QM database.
OpenQM, from Ladybridge Systems is the only MultiValue database available both as a fully supported commercial product and in open source form under the General Public License. As of OpenInsight release 9.3.1, there is a connector that will allow developers or users to use OpenInsight's tools, such as the GUI desktop, Banded Report Writer, or OpenInsight for the Web (O4W) with their QM database. It makes a very powerful combination and is surprisingly easy to set up and use. This article describes the theory behind how our connectors work, and how to use the QM Connector.
Theory of the QM Connector: the MV BFS
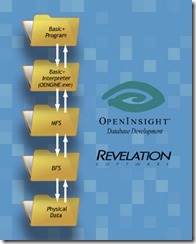
OpenInsight has its own MultiValue database. OpenInsight runs on Windows and relies upon the operating systems to handle the physical reading from and writing to disk. OpenInsight's database and processing engine, called OpenEngine, relies upon a Base Filing System (BFS) to interface between the physical storage of the data and the calling Basic+ (our version of the BASIC programming language) program.
A BFS turns the Basic+ file requests into the logic required to access the physical data. The BFS makes the Basic+ program independent of filing systems by providing this translation layer.
There are as many BFSs as there are ways to store data. Each BFS can use a vastly different means of physically storing the data, so long as it accepts from and provides to a Basic+ program a conventional record, namely, a dynamic array.
OpenInsight also has a Modifying Filing System (MFS) that is a Basic+ routine that fits between Basic+ programs and the BFS. An MFS allows a developer to decide which of the operations made against a file (Read, Write, Select, etc) they wish to observe or modify in a Basic+ program.
OpenInsight's QM Connector uses a BFS named MVBFS. This BFS relies on Ladybridge System's interface to the QM database. This interface is only available on QM versions 1.12-17 and higher. Figure 1 shows a generic flowchart of OpenInsight and its BFSs.
Fig. 1 OpenInsight's Interface to Operating System Files
Requirements for Connecting to the QM Databases
In order to connect to QM, OpenInsight requires Ladybridge's OpenQM version 2.12-7 and above, OpenInsight version 9.3.1 and above, and the installation of the OpenInsight client on the workstation. OpenInsight ships with an executable named, oddly enough, ClientSetup.exe. This file, when run, offers to install various components used by various parts of OpenInsight such as reporting, .Net functionality, Data Encryption at Rest, and so on. You will need to run this client install on any client using OpenInsight. This install can be 'pushed' from the server, but for the purposes of this example, please run the ClientSetup.exe manually.
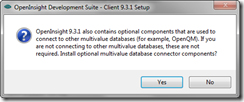
The Client Setup process will prompt you to install the necessary MultiValue database connector components. Choose "Yes" to install these components, as seen in figure 2.
Fig. 2
Connecting to the QM Databases
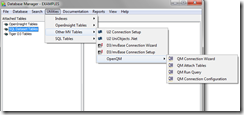
The first step in using OpenInsight's QM Connector is to establish a connection to the QM data source. This can be found in OpenInsight by opening the Database Manager and choosing Utilities-Other MV Tables-OpenQM-QM Connection Wizard. (Fig. 3)
Fig. 3 Choosing the QM Connection Wizard from the Database Manager
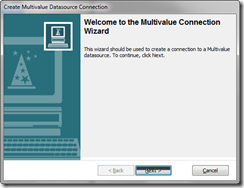
This will call up the MultiValue Connection Wizard, as seen in figure 4.
Fig. 4 The MultiValue Connection Wizard
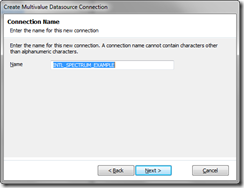
First off, we need to give this connection a name. This name will be used by OpenInsight as an identifier for the connection, and will allow OpenInsight to 'Attach', or create a logical tie, to the files/tables that will be used at that location.(Fig. 5)
Fig. 5 The Connection Name Panel
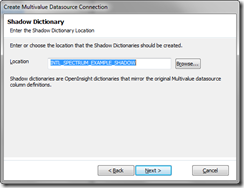
Clicking on the 'Next' button brings up a panel that prompts for the location of the Shadow Dictionary location. Shadow Dictionaries are OpenInsight versions of the column definitions that define the OpenQM file. OpenInsight does not want to affect the column definitions on the OpenQM data source, so a local copy is made. There are a number of advantages to this, including formatting for OpenInsight reports.
The Wizard offers a default folder location where the shadow dictionaries will be created. If a full path is not specified a directory will be created within your OpenInsight folder. We will accept this default, and then click on the 'Next' button. (fig. 6)
Fig. 6 The Shadow Dictionary Panel
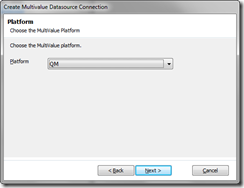
The Platform panel is where the user will choose the flavor of the MultiValue system they are going to connect to. Currently, OpenInsight has separate connectors for U2, D3, mvBase and QM. Our connector technology has advanced to the point that we are able to use a common wizard to connect to all the different MultiValue flavors. While this Wizard will eventually be modified to be the wizard for all MultiValue data sources, it is currently set up only for QM. Click on the Next button to proceed. (fig. 7)
Fig. 7 The Platform Panel
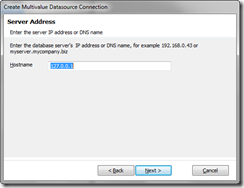
The next panel displayed is where the IP address of the OpenQM server is entered.
The IP Address lets OpenInsight know the address of the server, either on the local machine, the local network, or the World Wide Web. The OpenQM server can be Widows, Unix, or Linux based. The wizard defaults the IP Address to 127.0.0.1, which is the local host machine. You should either change it to the address given to you by the System Administrator, or accept the default. Click on the Next button to proceed to the Server Port Panel. (fig. 8)
Fig. 8 The Server Address Panel
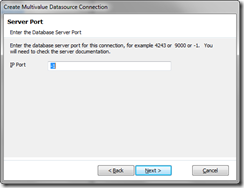
Clicking on the 'Next' button brings up the Server Port panel. The Server Port number is the communication port number on the server that OpenInsight will connect through. OpenQM version 2.12-17 supports port number -1, so that is what OpenInsight defaults to. An entry of -1 will find the correct OpenQM port automatically. You can either accept the default, or change it to the Port Number given to you by the System Administrator. (fig. 9)
Fig. 9 The Server Port Panel
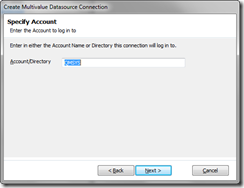
Clicking on the 'Next' button brings up the Account/Directory panel. The Account/Directory Panel is where the user enters the name of the account where the OpenQM files are stored, or the directory that holds the QM files the user wants to work with.
For the purposes of this exercise we will use the QMSYS account. Enter that name and click on the 'Next' button. (fig. 10)
Fig. 10 Specify the Account to connect to
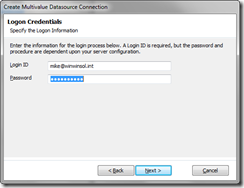
Clicking on the Next button will bring up the Logon Credentials form. The Logon Credentials screen is where the user enters the information needed for OpenInsight to connect to the OpenQM server.
The Logon ID is a username accepted on the server. The Password is the password required by the Logon ID.
For this example, I'll use my username and password, and then click on the Next button. (fig. 11)
Fig. 11 The Logon Credentials Panel
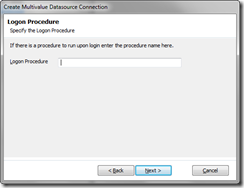
The next panel asks information about the Logon Procedure. The Logon Procedure is the name of a procedure that will run on the QM server when OpenInsight connects using the Logon ID specified.
Here's an important point: If your QM LOGIN procedure has prompts or inputs, it is necessary to insert a line of code such as:
IF @TTY = 'vbsrvr' THEN STOP.
This line allows the paragraph to terminate correctly for the QM Connector users. This stops things like menus, etc. from trying to appear and corrupting the client/server communication. For this example, we will not use a login procedure. (fig. 12)
Fig. 12 The Login Procedure Panel
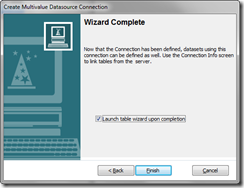
Clicking on the next button brings up the Wizard completion panel. This panel has the usual 'Finish' button, but there is also an additional checkbox labeled 'Launch Table Wizard upon completion'. If this box is checked when the Finish button is clicked, a secondary wizard is launched where the user can choose which files to make use of in the QM application that they are connecting to. For the purposes of this example, let us presume the checkbox is checked, as seen in Figure 13, and we'll click on the Finish Button.
Fig. 13 The Wizard Completion Panel
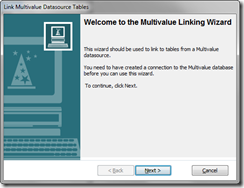
Clicking on the finish button will update OpenInsight's file definitions, and a couple of messages may flash across the screen. After that, the MultiValue Linking Wizard will appear, as seen in Figure 14. Click on the Next button to begin.
Fig. 14 The MultiValue Linking Wizard
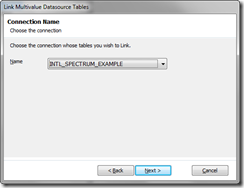
Once the next button has been clicked, the Connection Name panel appears. This panel contains a list of all the connections defined for the application. Choose the connection that corresponds to the QM application whose tables you want to connect to. For the purposes of this example, we'll choose the INTL_SPECTRUM_EXAMPLE connection, and click on the Next button, as seen in Figure 15.
Fig. 15 The Connection Name Panel
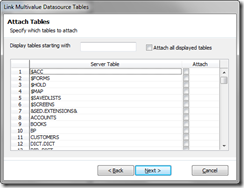
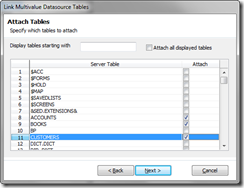
Clicking on the Next button will call up the Attach Tables panel. This panel shows a list of all the tables (or files if you prefer) in the QM application that is being attached, as seen in Figure 16. The user can then decide on which tables they want to connect at that time by clicking on the check boxes in the grid, as seen in Figure 17. After the tables have been chosen, click on the Next button. That will bring up the Wizard completion page, where the use should click on the Finish button.
Fig. 16 The tables in the QM application
Fig. 17 Tables selected from the QM application
Testing the Connection
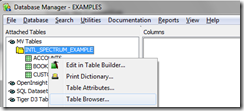
A very quick way to ascertain as to whether or not the connection is working is to use OpenInsight's Table Browser. From the Database Manager, look at the Attached table in the left-hand panel. Click on the MV tables, expand the list of connections, and expand the connection you just made, in our case the connection named INTL_SPECTRUM_EXAMPLE. Once the list of tables has expanded right-mouse-click on one of the tables. In our case, we'll choose the CUSTOMERS table, and choose the Table Browser, as seen in figure 18.
Fig. 18 Choosing the Table Browser from the Context Sensitive Menu
Once the Table Browser has appeared, and the load button has been clicked, the Table Browser will be populated with data from the table, as seen in Figure 19.
Fig. 19
And now…
Is that it? No, of course not, but now you have the entire OpenInsight toolset available for your use. Perhaps your green screen application is not dead; perhaps your green screen application is the server for an OpenInsight GUI client, or better yet, a browser-based application that will run on any desktop or mobile device with a browser. Pair these two excellent products to maximize your existing investment in MultiValue tools, maximize your MultiValue knowledge, and maximize your sales and consulting time.

